28 KiB
Restore Nvidia Shield ST8
In 2014 nvidia released their own Nvidia Shield tablet. This is quite a good tablet with as main selling point it's Tegra K1 SoC with a good GPU. The tablet was aimed at gamers.
However, shortly after launch it was discovered that some batteries had the tendency to expand or burn. In order to solve this, Nvidia decided to start a replacement program. Users could enter their serial number on a Nvidia website, along with their home address and would receive a new tablet from Nvidia without any costs. The old tablet would then be disabled remotely.
Introduction
OTA
Back then a relatively new concept was introduced in Android devcies, which was the Over The Air(OTA) update, which is just an update mechanism for android devices. This mechanism allowed Nvidia to push updates to specific devices. The update that was pushed to devices that were set to be disabled was simple, it corrupted the BCT(more later) and Bootloader of the bad tablets and forced a reboot. After that the device would never wake again(up until now).
On XDA there is a big post about how the update works. So all credits here to the people that investigated the update back then( @Beauenheim, @Jackill, and @runandhide05)
This post will restore one of the disabled tablets back to it's functioning state. To do this a bootROM exploit will be used and a debugger that I developed in the process. It also serves as an example device for several other use cases which I will write a post about later.
Nintendo Switch
The Nintendo Switch is a game console that was launched in 2017 that contains almost the same chip as the Nvidia Shield Tablet. Several independent researchers found a bug in the BootROM and used it to gain access to the Nintendo Switch(fusee gelee). This exploit was then adapted to the T124 chip which is in the Nvidia Shield by this guy.
So, there is a method to gain RCE on a device, let's try to see if we can restore a tablet.
EMMC
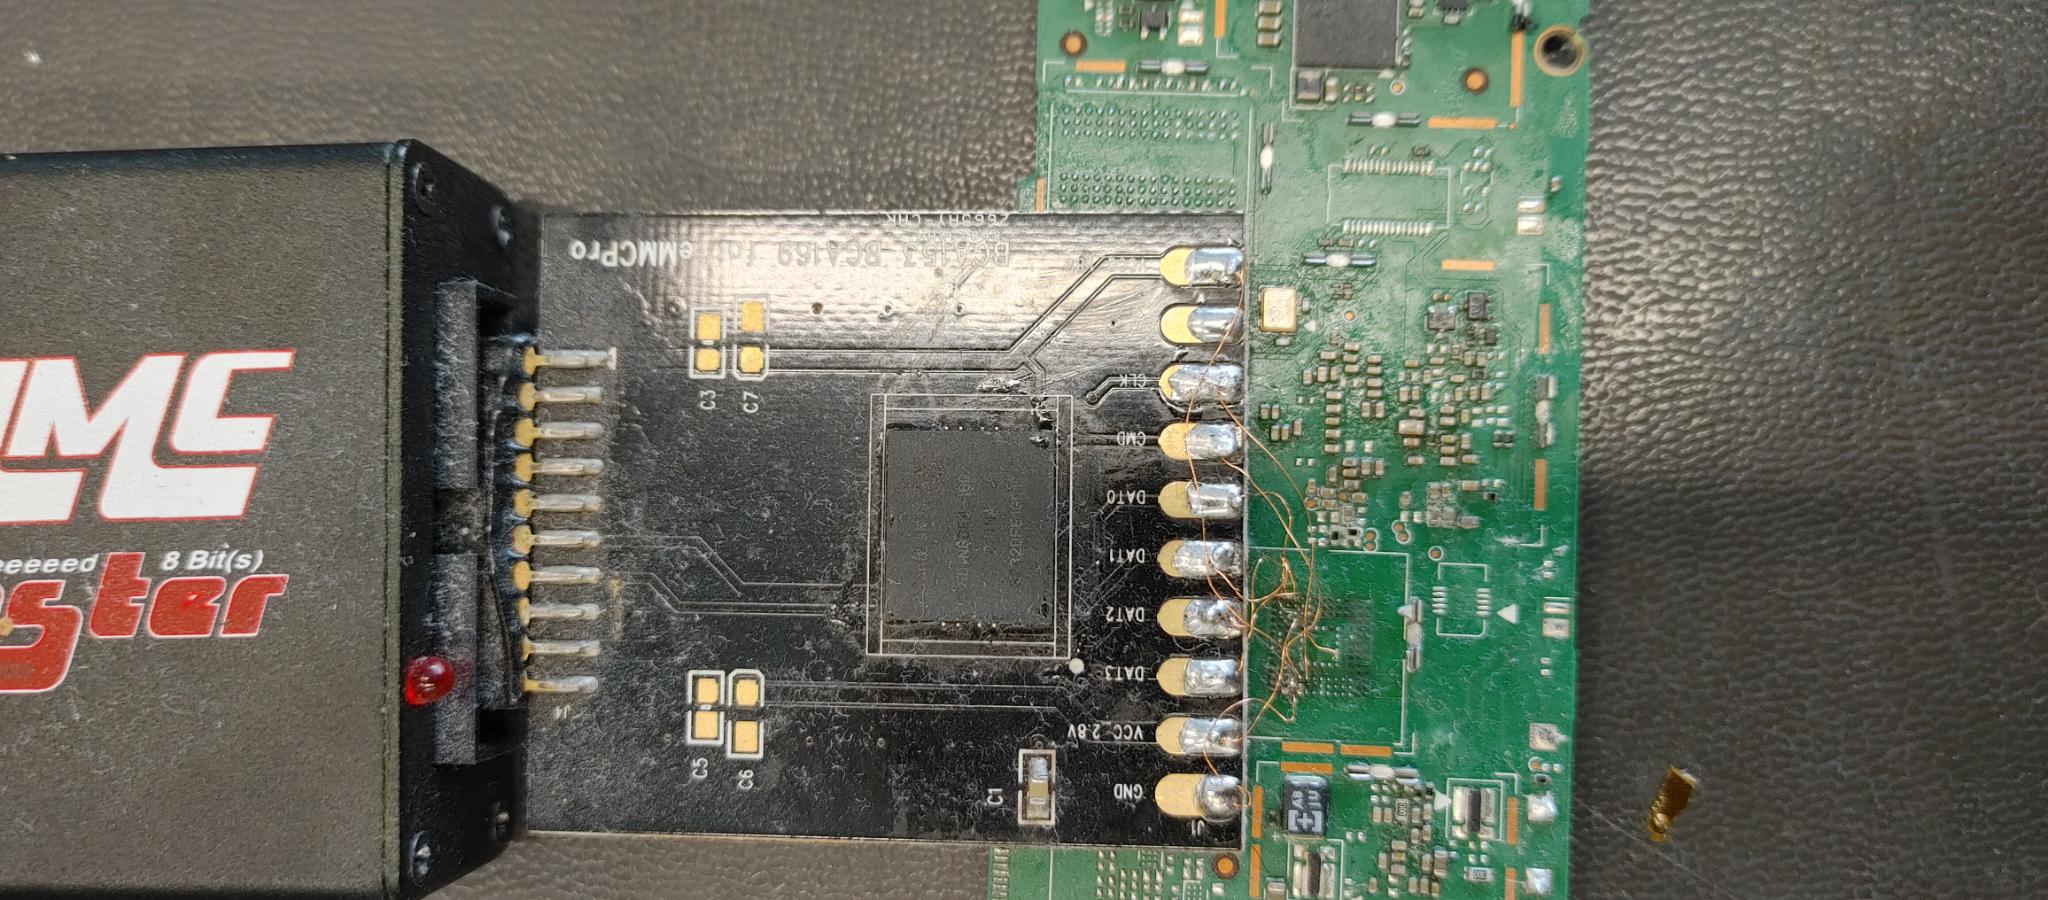
The simplest approach to unbricking this device is to unsolder it and reprogram it. To reprogram it you can use a EMMC writter, like EasyJTAG or a device as I used below:
This will connect the device as a sdcard and allows you to reflash the bootloader. The chip can then be soldered back to the tablet and it will work again.
But this is no fun at all and I can't introduce my debugger, so let's continue our software only approach.
Debugger
The first goal is to build my debugger for this target. When connecting the device to a Linux based PCB I see the following message in dmesg:
[323058.201469] usb 1-5.3.1: new high-speed USB device number 91 using xhci_hcd
[323058.302006] usb 1-5.3.1: New USB device found, idVendor=0955, idProduct=7f40, bcdDevice= 1.01
[323058.302011] usb 1-5.3.1: New USB device strings: Mfr=1, Product=2, SerialNumber=0
[323058.302012] usb 1-5.3.1: Product: APX
[323058.302014] usb 1-5.3.1: Manufacturer: NVIDIA Corp.
And in lsusb
Bus 001 Device 091: ID 0955:7f40 NVIDIA Corp. APX
APX is the emergency download mode from Nvidia, similar to EDL mode on Qualcomm devices. Reusing the code from LordRafa I dumped the BootROM and loaded into Ghidra. On github also the source code of both T210 and T214 bootROMs was leaked, which makes reversing very easy.
BCT
One of the offsets provided by LordRafa is do_bct_boot, which should allow loading a BCT without security checks. This would be a good starting point, however upon further inspection it only resets the chip on my ROM:
void NvBootMainNonsecureRomEnter?(void)

{
  int iVar1;
  uint boot_tar;
  int iVar2;

                    /* inline function to configure clocks */
  NvBootClocksSetEnable(0x66,1);
    [..]
  iVar2 = NvBootFuseIsFailureAnalysisMode();
  if (((iVar2 != 0) || (iVar2 = NvBootFuseIsPreproductionMode(), iVar2 != 0)) &&
     ((iVar2 = NvBootFuseIsPreproductionMode(), iVar2 == 0 ||
      (((*(uint *)(iVar1 + 0x10) & 1) == 0 && ((*(uint *)(DAT_00100634 + 0x24) >> 0x1a & 0xf) == 0))
      )))) {
    iVar1 = NvBootFuseIsFailureAnalysisMode();
    if (iVar1 != 0) {
      *DAT_00100638 = *DAT_00100638 & 0xfffffffe | 0x10;
    }
    NvBootFromUart(boot_tar);
    // 00100624 here
    NvBootResetFullChip();
  }
  return;
}
00100624 00 f0 d8 f8 bl NvBootResetFullChip
I think the inteded function was 4 bytes higher and that would allow booting a BCT from UART. This is nice, however I have no UART on this device. There is a github issue that describes a UART interface over the sd card controller. I don't know if it will work from within the ROM and it's probably no worth the effort since I will probably have to maintain control over the device after it boot's the BCT(Trustzone, Fastboot locks).
PCB
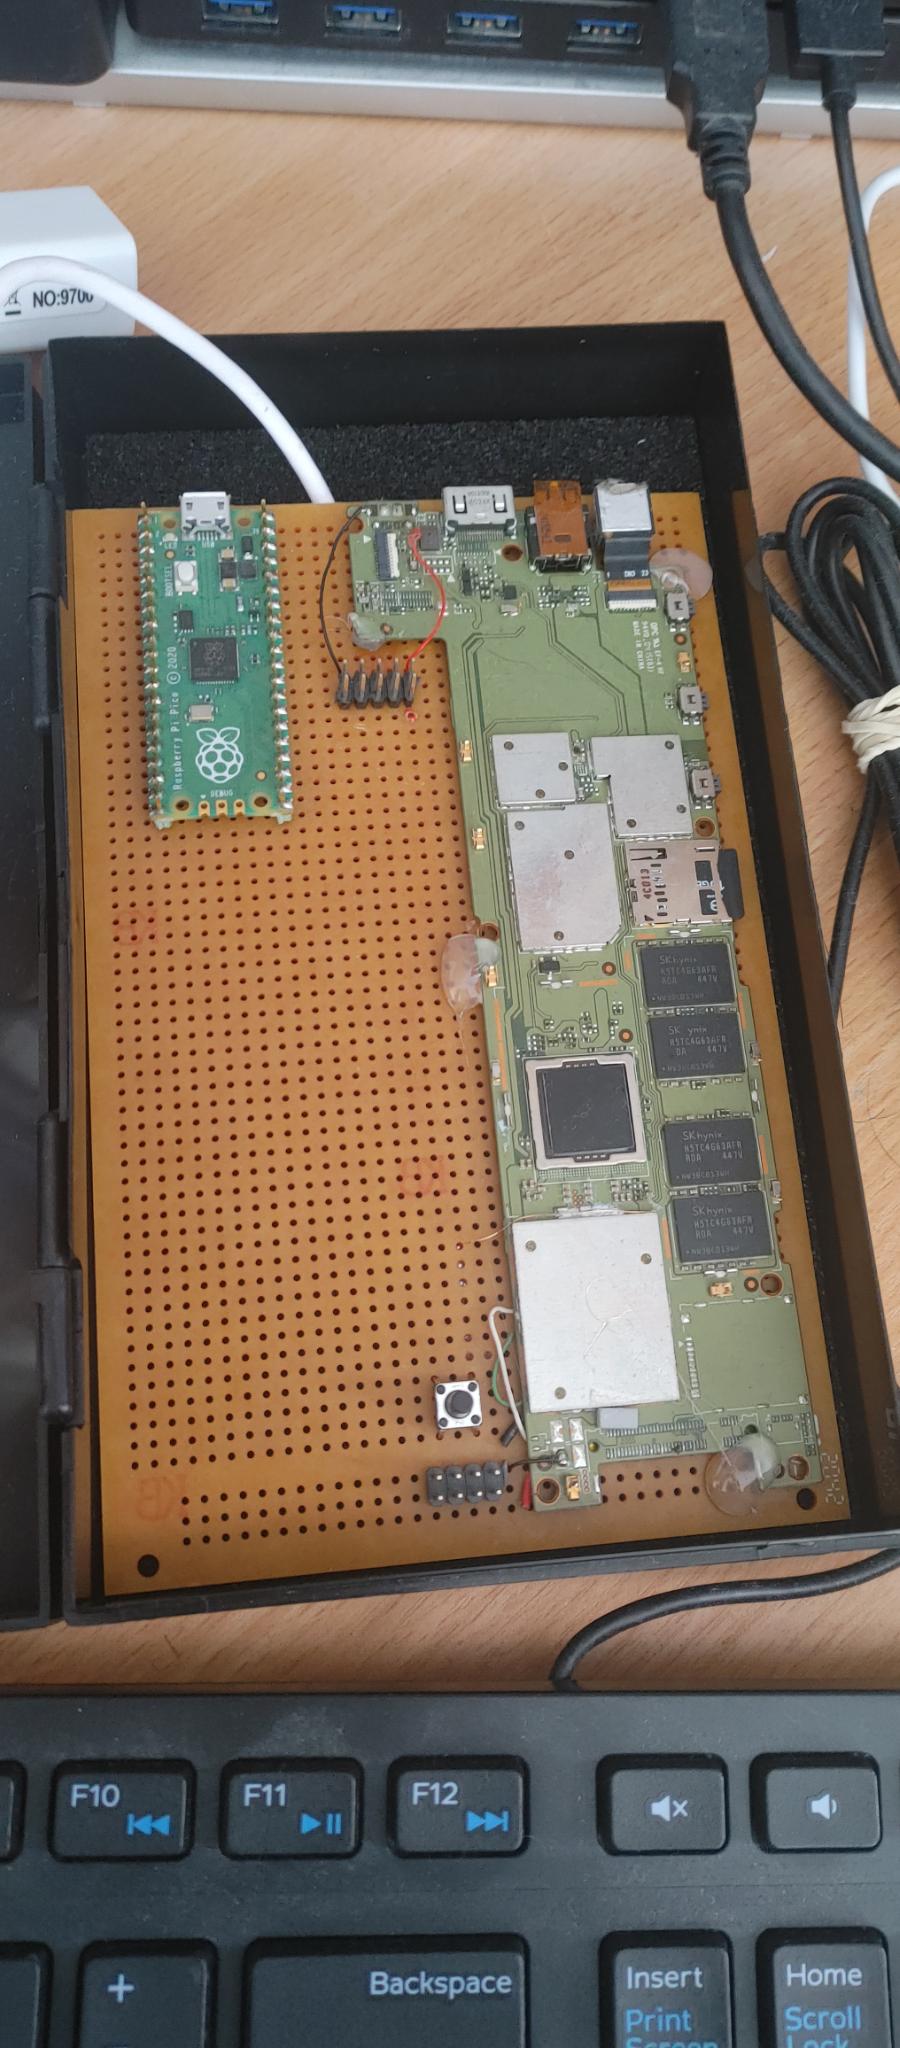
The exploit chain from LordRafa allows us load and jump into a new payload. When the device hangs you can press and hold the power button to let it reset and then try again. One thing I learned is that it's always worth the time to make a proper debug setup. So I took a PCB out of a tablet, connect it to a laptop and started shorting lines to ground on the tablet PCB. At some point there was a reset which I can see in dmesg. I soldered this line to a button and put the whole thing on a PCB. This way I can reset the device with a single push and try again. Saves lots of time and frustration.
I ofcourse forgot to document what I soldered before applying the hot glue so I have no clue which pin it was that I am shorting.
There is also a Raspberry Pico on this board which might be usefull for glitching later on.
Debugger instrumentation
LordRafa already found the USB send/recv functions. Upon further inspection we can also see where our payload needs to be loaded, let's try to connect the debugger.
Send/Receive
#define BOOTROM_EP1_IN_WRITE_IMM    0x001065C0
#define BOOTROM_EP1_OUT_READ_IMM    0x00106612

typedef void (*ep1_x_imm_t)(void *buffer, uint32_t size, uint32_t *num_xfer);
ep1_x_imm_t usb_recv = (ep1_x_imm_t) ( BOOTROM_EP1_OUT_READ_IMM | 1 );
ep1_x_imm_t usb_send = (ep1_x_imm_t) ( BOOTROM_EP1_IN_WRITE_IMM | 1 );


void send(void *buffer, uint32_t size, uint32_t *num_xfer){
    usb_send(buffer, size, num_xfer);
}

int recv(void *buffer, uint32_t size, uint32_t *num_xfer){
    usb_recv(buffer, size, num_xfer);
    return (int)&num_xfer;
}
For the Peek/Poke part this is all that actually needs to be setup for the debugger to function properly. For this target at least
Memory
The debugger needs to know where it is located at compile time, as well where the stack and storage locations are. We define them in a symbols file and to the linker:
debugger_storage = 0x40013000;
debugger_stack = 0x40014000;
Linker script
MEMORY {
    ROM (rwx): ORIGIN = 0x4000E000, LENGTH = 0x1000
}

SECTIONS
{
     . = 0x4000E000;
     .text . : {
          *(.text*)
          *(.data*)
          *(.rodata*)
     } >ROM

}
Finally we need to build the target:
ifeq ($(ANDROID_NDK_ROOT),)
$(error Error : Set the env variable 'ANDROID_NDK_ROOT' with the path of the Android NDK (version 20))
endif

#ARM thumb mode
TOOLCHAIN_ARM_T := $(TOOLCHAINENV)/gcc-arm-none-eabi-10-2020-q4-major/bin/arm-none-eabi-
CC_T = $(TOOLCHAIN_ARM_T)gcc
AS_T = $(TOOLCHAIN_ARM_T)as
OBJCOPY_T = $(TOOLCHAIN_ARM_T)objcopy
LD_T = $(TOOLCHAIN_ARM_T)ld.bfd

#For building in thumb mode
CFLAGS_THUMB := -Wall -Werror -MMD -Wno-unused-variable \
	-march=armv4t -mthumb -Os -ffreestanding -fno-common \
	-fomit-frame-pointer -nostdlib -fno-builtin-printf  \
	-fno-asynchronous-unwind-tables -fPIE -fno-builtin \
	-Idevices/nvidia_shield_t/ \
	-fno-exceptions -Wl,--no-dynamic-linker,--build-id=none

all: nvidia_shield_t

nvidia_shield_t:
	[ -d bin/nvidia_shield_t ] || mkdir -p bin/nvidia_shield_t/
	$(CC_T) armT_stub.S -c -o bin/nvidia_shield_t/entry.o
	$(CC_T) debugger.c -c -o bin/nvidia_shield_t/debugger.o $(CFLAGS_THUMB)
	$(LD_T) -T devices/nvidia_shield_t/linkscript.ld bin/nvidia_shield_t/entry.o bin/nvidia_shield_t/debugger.o -o bin/nvidia_shield_t/debugger.elf --just-symbols=devices/nvidia_shield_t/symbols.txt
	$(OBJCOPY_T) -O binary bin/nvidia_shield_t/debugger.elf bin/nvidia_shield_t/debugger.bin
I copied the flags from LordRafa's payload.
So a memory map will look as follows:
Ghidra Assistant
Let's connect to it from the Ghidra Assistant. I rewrote the ShofEl2 exploit in python. The class is called TegraRCM, maybe I will write a bit more on it later how it works but there are plenty of descriptions of the fusee-gelee exploit.
def device_setup(concrete_device : "ConcreteDevice"):
    #Setup architecture
    concrete_device.arch = QL_ARCH.ARM
    concrete_device.ga_debugger_location = 0x4000E000
    concrete_device.ga_vbar_location = 0x40011000
    concrete_device.ga_storage_location = 0x40013000
    concrete_device.ga_stack_location = 0x40014000

    rcm = TegraRCM()
    rcm.dev.read_chip_id()
    file = "/home/eljakim/Source/gupje/source/bin/nvidia_shield_t/debugger.bin"

    rcm.send_payload(file, thumb=1)
    concrete_device.arch_dbg = GA_arm_thumb_debugger(concrete_device.ga_vbar_location, concrete_device.ga_debugger_location, concrete_device.ga_storage_location)

    assert(rcm.dev.read(0x100) == b"GiAs")

    concrete_device.arch_dbg.read = rcm.dev.read
    concrete_device.arch_dbg.write = rcm.dev.write

    #Overwrite all calls to make the concrete target function properly
    concrete_device.copy_functions()
Once we see b"GiAs" over our USB endpoint we know that the debugger is functional. We can test this by sending b"PING" over USB:
rcm.dev.write(b"PING") # Writes
rcm.dev.read(0x100) # try to receive some data.
b'PONG'
The ConcreteDevice implementation needs to be configured with the correct addresses of the debugger and be told what the architecture is. In this case this is thumb and the Architecture debugger is set to this mode.
Playing around
Because the debugger is running we can now do some really cool stuff. For instance let's try to see the state of the processor:
cd.arch_dbg.state.print_ctx(print)
            PC: 0x4000e02e       LR: 0x4000df9d  SP: 0x4000dcb0  FP: 0x       0
            R0: 0x4000df95       R1: 0x400139cc  R2: 0x       0  R3: 0x       1
            R4: 0x4000e001       R5: 0x     3c4  R6: 0x       0  R7: 0x4000df55
            R8: 0x4000df55       R9: 0x  261411 R10: 0x  10c584 R11: 0x       0
            R12: 0x       0     R13: 0x4000dcb0 R14: 0x4000df9d R15: 0x4000e02e
We can also change the registers of the target device:
cd.arch_dbg.state.LR = cd.arch_dbg.debugger_addr | 1
And, one of the coolest features. We can restore the context and jump to a user specified address. So if we have the following function in our BootROM:
uint32_t NvBootUtilGetTimeUS(void)
{
  return *(uint32_t *)(DAT_00100ca4 + 0x10);
}
We can actually call it with:
def NvBootUtilGetTimeUS():
    cd.arch_dbg.state.LR = cd.arch_dbg.debugger_addr | 1
    cd.arch_dbg.restore_stack_and_jump(0x00100c7e | 1)
    assert cd.read(4) == b'GiAs', "Debugger crashed?"
    return cd.arch_dbg.state.R0
And this is our time apparantly:
hex(NvBootUtilGetTimeUS())
'0x6220ac69'
hex(NvBootUtilGetTimeUS())
'0x63459919'
hex(NvBootUtilGetTimeUS())
'0x637c611a'
hex(NvBootUtilGetTimeUS())
'0x63936828'
The debugger becomes a pythonic representation of bare assembly instructions. Let's do a bit more advanced stuff, like loading a bootloader.
Boot flow
Now that we have the debugger running, let's see what is going on when we boot. Below is a simplistic overview of the bootflow from what I reversed:
The function NvBootMainSecureRom enters RCM mode when cold booting fails. Lets take a look at the function:
void NvBootMainSecureRomEnter(void)

{
  NvBootInfoTable *pNVar1;
  [..] //more hardware setup
  (BootInfoTable->BootTimeLog).NvBootTimeLogInit = *(NvU32 *)PTR_DAT_001015f8;
  NvBootMainSetupAesEngines();
  pNVar1 = BootInfoTable;
  if (iswarmboot == 0) {
                    /* Coldboot path
                        */
    FUN_00103bf4();
    FUN_0010392c();
    puVar5 = BootRomVersion;
    bootinfo = BootInfoTable;
    BootInfoTable->BootRomVersion = *(NvU32 *)BootRomVersion;
    bootinfo->DataVersion = *(NvU32 *)(puVar5 + 8);
    bootinfo->RcmVersion = *(NvU32 *)(puVar5 + 4);
    bootinfo->PrimaryDevice = NvBootDevType_Spi;
    NVar3 = NvBootClocksGetOscFreq();
    bootinfo->OscFrequency = NVar3;
    *(NvU32 **)&bootinfo->PmuBootSelReadError = &bootinfo->SafeStartAddr;
    IsForceRcmByStrap = NvBootStrapIsForceRecoveryMode();
    IsForceRcmByPmc = NvBootPmcQueryFlag(2);
    puVar5 = PTR_FUN_00100588+1_00101600;
    if ((IsForceRcmByStrap | IsForceRcmByPmc) == 0) {
      NVar4 = NvBootColdBoot((int *)&BootAddress);
                    /* Here is where we go to RCM mode, the BCT loading fails
                        */
      if ((NVar4 != NvBootError_None) &&
         (haltvalue = NvBootRcm(false,SUB41(&local_28,0),&BootAddress,in_r3), haltvalue != 0)) {
        BootAddress = puVar5;
      }
      goto continue_boot;
    }
    [..] // extra code, but boots in RCM
      haltvalue = NvBootRcm(true,SUB41(&local_28,0),&BootAddress,in_r3);
  }
  else {
    // Warmboot path
continue_boot:
  haltvalue = NvBootMainProcessSecureDebugControl
                        (iswarmboot,(uint)pNVar1->BctValid,local_28 & 0xff,(int)&local_28);
  if (haltvalue != 1) {
    IsFactorySecureProvisioningMode = IsFactorySecureProvisioningMode | 8;
  }
  haltvalue = NvBootFuseIsOdmProductionMode();
  NvBootMainSecureRomExit
            (iswarmboot,BootAddress,IsFactorySecureProvisioningMode,(uint)(haltvalue == 0));
  NvBootResetFullChip();
  return;
}
A variable bootinfo is loaded from a hardcoded offset in memory and populated with some version info and then passed to the function NvBootColdBoot. We want to execute that function to see what is the result. The easiest method would be to patch this function and jump back to the debugger. If we jump in at
puVar5 = BootRomVersion;
We can continue execution until after NvBootColdBoot. But can we patch code in the ROM? Let's test this:
cd.memwrite_region(0x00101318, b"\xdd" * 0x10)
hexdump(cd.memdump_region(0x00101318, 0x20))
           ┌─────────────────────────────────────────────────┬──────────────────┐
0x00000000 │ f0 b5 00 24 85 b0 b5 4d 01 20 01 94 00 94 00 f0 │ ...$...M. ...... │
0x00000010 │ 98 fd 01 f0 bf f9 00 f0 a8 fc 00 28 07 d0 00 f0 │ ...........(.... │
           └─────────────────────────────────────────────────┴──────────────────┘
The result is not written back. The reason for this is that the ROM is shadowed(No faults are raised while trying to write to it). This means we can't write patches to the ROM. One approach would be to remap part of the ROM to RAM. This would allow patching but it's quite a bit of work. This will probably become a feature of the debugger in the future but for now it's not supported by default. Maybe instead we can just setup the memory structure ourself and execute the function?
NVCOLDBOOT = 0x00101ad2
def nvbootcoldboot():
    '''
    Works, attempts to load the BCT from the EMMC
    '''
    nvbootinfo = 0x40000000
    cd.write_u32(nvbootinfo, 0x400001)
    cd.write_u32(nvbootinfo + 4, 0x400001)
    cd.write_u32(nvbootinfo + 8, 0x400001)

    # cd.write_u32(nvbootinfo + 0xc, 0x00000001) # Boot type, set later also

    cd.write_u32(nvbootinfo + 0x10, 5) #Irom
    # cd.write_u32(nvbootinfo + 0x10, 9)

    def NvBootClocksGetOscFreq():
        return cd.read_u32(cd.read_u32(0x00100214) + 0x10) >> 0x1c
    cd.write_u32(nvbootinfo + 0x28, NvBootClocksGetOscFreq()) #Irom
    cd.write_u32(nvbootinfo + 0xf0, nvbootinfo + 256) # End of boot info

    # Move debugger in r0, to jump to that on failure
    cd.arch_dbg.state.R0 = 0x40020000 # cd.ga_debugger_location | 1
    cd.arch_dbg.state.LR = cd.ga_debugger_location | 1
    cd.restore_stack_and_jump(NVCOLDBOOT | 1)

    assert cd.read(4) == b"GiAs", "Failed to jump to debugger"

nvbootcoldboot()
cd.arch_dbg.state.print_ctx(print)

    PC: 0x4003c02e       LR: 0x  109c15  SP: 0x4000dcb0  FP: 0x       0
    R0: 0x       8       R1: 0x       0  R2: 0x      11  R3: 0x4003c001
    R4: 0x4000e001       R5: 0x     3c4  R6: 0x       0  R7: 0x4000df55
    R8: 0x4000df55       R9: 0x  261411 R10: 0x  10c584 R11: 0x       0
    R12: 0x  109aef     R13: 0x4000dcb0 R14: 0x  109c15 R15: 0x4003c02e
The error code, in this case is 8 or NvBootError_DeviceError, this is because I desoldered the EMMC chip for this device. On a device with a working EMMC chip the error code is 24 or NvBootError_IdentificationFailed.
K1 tablet
At this point I bought a working K1 tablet from marktplaats(Dutch ebay). Since this tablet has the same SoC it will have the same BootROM vulnerability and I can reuse my code while also see what would be a correct boot flow.
If we execute the same function on the K1 tablet the result is 0x0, as expected. Also the local variable &BootAddress is set to 0x4000e000. This should be the target branch. Let's dump this region and see what is in it.
Looking with Ghidra, we can see that its valid code. The MSR instruction is clearly visible and you almost always find that instruction at the start of a bootloader, since the security/system control is transfered to that bootloader.
Maybe we can just try to boot this code directly? There is 1 issue however, the debugger is currently located at 0x4000e000 and loading the bootloader there would overwrite it. The debugger is build with this problem in mind, we can just relocate it to another position. To do this, we create a new entry in the Makefile and a new symbols_reloc.txt, along with a linkscript linkscript_reloc.ld:
symbols_reloc.txt
debugger_storage = 0x4003e000;
debugger_stack = 0x4003f000;
linkscript_relod.ld
MEMORY {
    ROM (rwx): ORIGIN = 0x4003c000, LENGTH = 0x1000
}

SECTIONS
{
     . = 0x4003c000;
     .text . : {
          *(.text*)
          *(.data*)
          *(.rodata*)
     } >ROM

}
And the Makefile
nvidia_shield_t_reloc:
	[ -d bin/nvidia_shield_t ] || mkdir -p bin/nvidia_shield_t/
	$(CC_T) armT_stub.S -c -o bin/nvidia_shield_t/entry.o
	$(CC_T) debugger.c -c -o bin/nvidia_shield_t/debugger_reloc.o $(CFLAGS_THUMB)
	$(LD_T) -T devices/nvidia_shield_t/linkscript_reloc.ld bin/nvidia_shield_t/entry.o bin/nvidia_shield_t/debugger.o -o bin/nvidia_shield_t/debugger_reloc.elf --just-symbols=devices/nvidia_shield_t/symbols_reloc.txt
	$(OBJCOPY_T) -O binary bin/nvidia_shield_t/debugger_reloc.elf bin/nvidia_shield_t/debugger_reloc.bin
We can load the debugger at that address and instruct the Ghidra Assistant that we are relocating the debugger. We can check if it worked by querying the debugger_main function of the debugger.
def relocate_debugger():
    '''
    Works, relocates the debugger to the end of IRAM
    '''
    reloc = open('/home/eljakim/Source/gupje/source/bin/nvidia_shield_t/debugger_reloc.bin', 'rb').read()
    cd.memwrite_region(0x4003c000, reloc)
    cd.restore_stack_and_jump(0x4003c000 | 1)
    assert cd.read(0x100) == b"GiAs"

    # And relocate the debugger
    cd.relocate_debugger(0x40011000, 0x4003c000, 0x4003e000)

relocate_debugger()
hex(cd.get_debugger_location())
'0x4003c199'
Works, now we can also update the memory map:
Let's load the new bootloader and see what happens:
boot_to = 0x4000e000
imem = open("imem3_bct", 'rb').read()
cd.memwrite_region(0x40000000, imem)
cd.arch_dbg.state.LR = cd.ga_debugger_location | 1
cd.restore_stack_and_jump(boot_to)
Crash ofcourse, didn't really expect that would work. But executing the same code on the working tablet results in a booting device. Let's debug what is going on.
Hooking
The stage2 bootloader contains a lot more strings than the ROM. I searched a bit on the internet to see if there were any leaked sources for this bootloader but I found nothing. Reversing bootloaders can be challenging when there are almost no strings, for this one there are several and they seem to be used to log the state of the bootloader over UART. Sadly we don't have UART to inspect what is going on, but we do have the debugger.
We can just place a hook in the log function and jump to the debugger. Then we can inspect the state of the device and dump the log string to see what is being logged. Setting up the hook is easy:
jump_stub = f"""
ldr r12, addr_debugger_main_t
bx r12
.align 4
addr_debugger_main_t:   .word {hex(cd.ga_debugger_location | 1)}
"""
jump_stub = ks_arm.asm(jump_stub, as_bytes=True)[0]

# Setup code for log hook
cd.memwrite_region(0x4001cadc, jump_stub)

cd.arch_dbg.state.LR = cd.ga_debugger_location | 1
cd.restore_stack_and_jump(boot_to)

while True:
    try:
        r = cd.read(0x100) #GiAs
        msg = cd.read_str(cd.arch_dbg.state.R0)
        print(msg)
        cd.restore_stack_and_jump(cd.arch_dbg.state.LR) # Restore as if nothing happened.
    except:
        pass
The output is fascinating: Good device boot
b'Checking whether Onsemi FG present \n'
b'[TegraBoot] (version %s)\n'
b'Processing in cold boot mode\n'
b'Reset reason: %s\n'
b'Battery Present\n'
b'Battery Voltage: %d mV\n'
b'Battery charge sufficient\n'
b'Error getting nvdumper carve out address! Booting normally!\n'
b'Sdram initialization is successful \n'
b'PMU BoardId: %d\n'
b'CPU power rail is up \n'
b'Performing RAM repair\n'
b'CPU clock init successful \n'
b'Bootloader downloaded successfully.\n'
b'CPU-bootloader entry address: 0x%x \n'
b'BoardId: %d\n'
b'%s Carveout Base=0x%x%08x Size=0x%x%08x\n'
b'%s Carveout Base=0x%x%08x Size=0x%x%08x\n'
b'%s Carveout Base=0x%x%08x Size=0x%x%08x\n'
b'%s Carveout Base=0x%x%08x Size=0x%x%08x\n'
b'%s Carveout Base=0x%x%08x Size=0x%x%08x\n'
b'Platform-DebugCarveout: %d\n'
b'Using GP1 to query partitions \n'
b'WB0 init successful\n'
b'Secure Os PKC Verification Success.\n'
b'Loading and Validation of Secure OS Successful\n'
b'NvTbootPackSdramParams: start. \n'
b'NvTbootPackSdramParams: done. \n'
b'Starting CPU & Halting co-processor \n\n'
And device with corrupted bootloader:
b'Checking whether Onsemi FG present \n'
b'[TegraBoot] (version %s)\n'
b'Processing in cold boot mode\n'
b'Reset reason: %s\n'
b'Battery Present\n'
b'Battery Voltage: %d mV\n'
b'Battery charge sufficient\n'
b'Error getting nvdumper carve out address! Booting normally!\n'
b'Sdram initialization is successful \n'
b'PMU BoardId: %d\n'
b'CPU power rail is up \n'
b'Performing RAM repair\n'
b'CPU clock init successful \n'
b'Instance[%d] bootloader is corrupted                         trying for next Instance !\n'
b'Instance[%d] bootloader is corrupted                         trying for next Instance !\n'
b'No Bootloader is found !\n'
b'Error in %s: 0x%x !\n'
b'Error is %x \n'
So the next stage bootloader is also broken sadly. Maybe we can do the same trick?
On the good device I placed a hook on the message Bootloader downloaded successfully, after dumping the registers it seems that the bootloader is loaded at address 0x83d88000(in DRAM). The bootloader is also much bigger thatn the previous bootloaders, which is a good sign(It probably contains fastboot).
For the bad device I waited for the message bootloader is corrupted and continue execution at just after the good log message:
elif b"corrupted" in msg or b"GPT failed" in msg:
    # Restore bootloader
    print(msg)
    dat = open("/tmp/bootloader.bin", 'rb').read()
    cd.memwrite_region(0x83d88000, dat[:0x90000])
    # Jump to bootloader loaded
    cd.arch_dbg.state.R0 = 0 # set bootloader as loaded correctly
    cd.arch_dbg.state.LR = 0x40018ea0
    cd.restore_stack_and_jump(cd.arch_dbg.state.LR)
    continue
this resulted in the following output:
1073803520:b'Checking whether Onsemi FG present \n'
1073799404:b'[TegraBoot] (version %s)\n'
1073799412:b'Processing in cold boot mode\n'
1073799416:b'Reset reason: %s\n'
1073847520:b'Battery Present\n'
1073847572:b'Battery Voltage: %d mV\n'
1073847596:b'Battery charge sufficient\n'
1073818392:b'Error getting nvdumper carve out address! Booting normally!\n'
1073818500:b'Sdram initialization is successful \n'
1073801672:b'PMU BoardId: %d\n'
1073843272:b'CPU power rail is up \n'
1073813604:b'Performing RAM repair\n'
1073843308:b'CPU clock init successful \n'
b'Instance[%d] bootloader is corrupted                         trying for next Instance !\n'
1073800404:b'CPU-bootloader entry address: 0x%x \n'
1073800444:b'BoardId: %d\n'
1073844416:b'%s Carveout Base=0x%x%08x Size=0x%x%08x\n'
1073844524:b'%s Carveout Base=0x%x%08x Size=0x%x%08x\n'
1073844608:b'%s Carveout Base=0x%x%08x Size=0x%x%08x\n'
1073844692:b'%s Carveout Base=0x%x%08x Size=0x%x%08x\n'
1073844788:b'%s Carveout Base=0x%x%08x Size=0x%x%08x\n'
1073800708:b'Platform-DebugCarveout: %d\n'
1073858616:b'Using GP1 to query partitions \n'
1073843044:b'WB0 init successful\n'
1073848940:b'Secure Os PKC Verification Failed !\n'
1073848972:b'Error in %s [%d] \n'
1073849136:b'Validation of secure os failed !\n'
1073801008:b'Device Shutdown called ...\n'
It seems something like trustzone is used to verify the next boot stage. And since this bootloader is taken from another device(K1 revision) its probably signed with the wrong keys. We can just try to not do the trustzone call and see if it will boot?
Let's place a hook at the message WB0 init succesful and jump to the function after trustzone validation:
elif b"WB0" in msg:
    cd.arch_dbg.state.print_ctx(print)
    cd.arch_dbg.state.LR = cd.ga_debugger_location | 1
    cd.restore_stack_and_jump(0x4000e188)
    continue
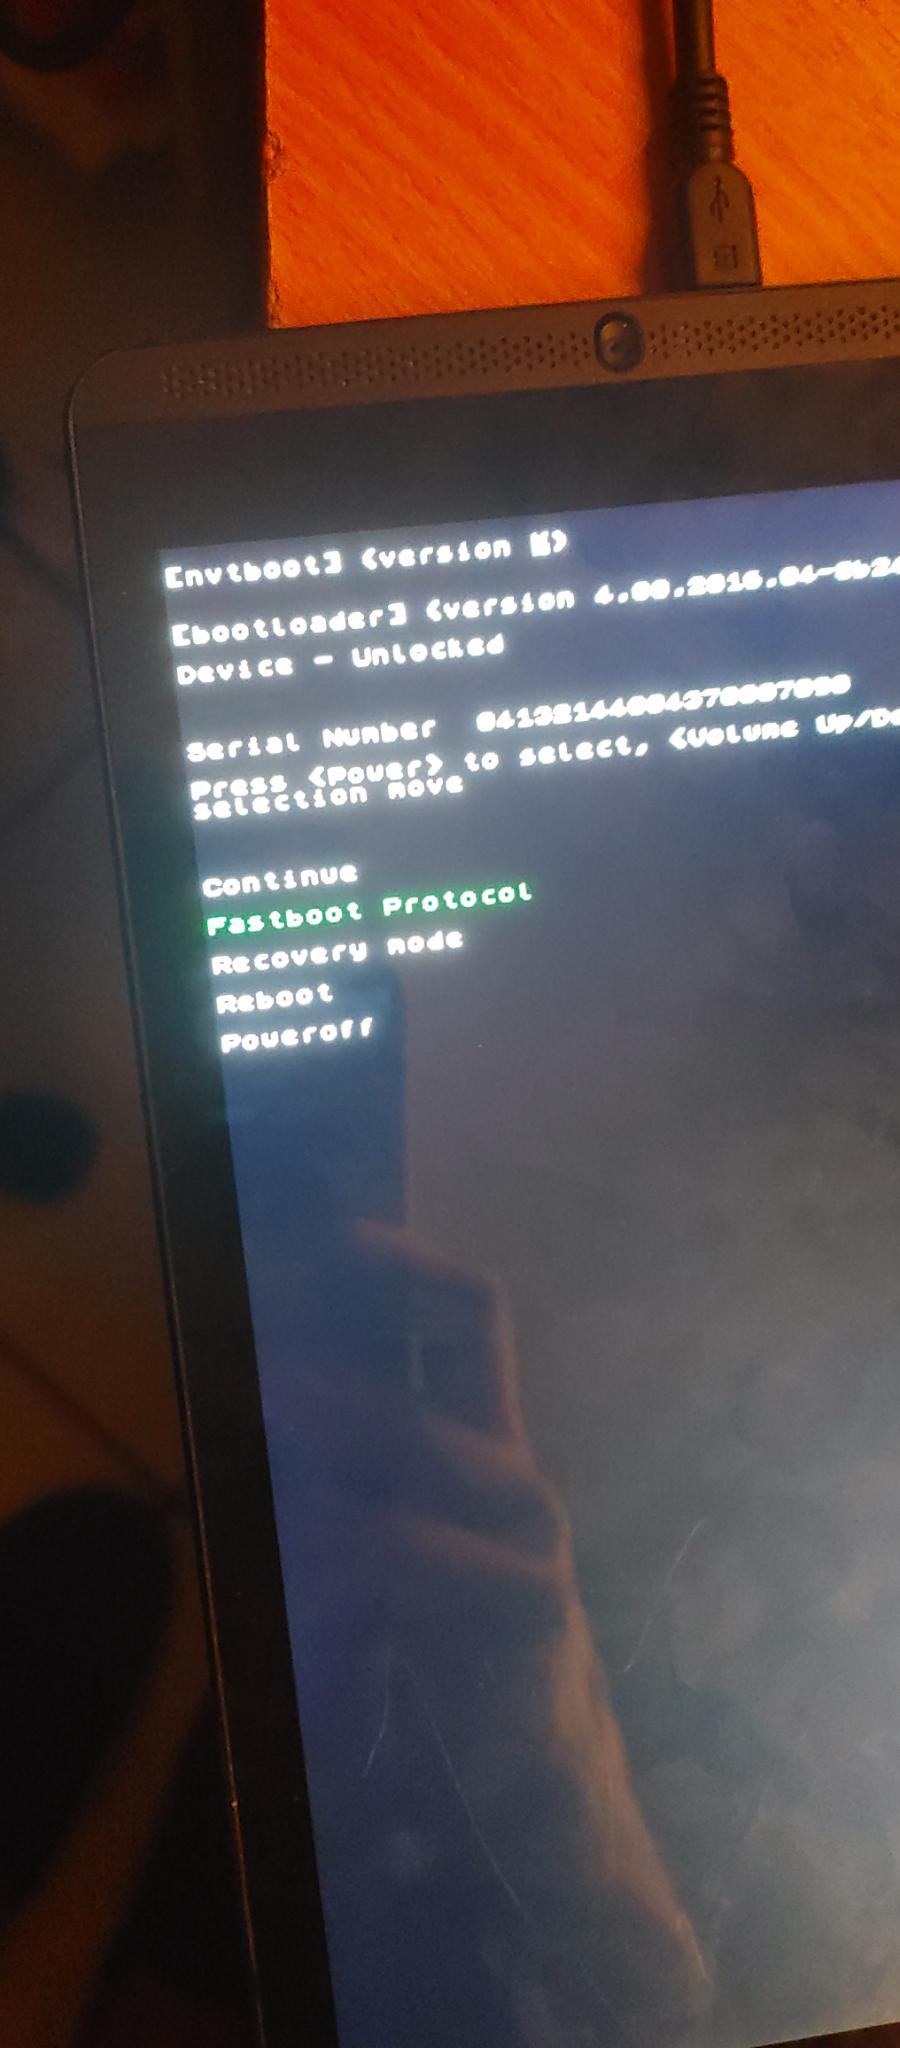
Profit! The device boots!
Now, let's try to flash a good bootloader. I grabbed the last update from nvidia's website and unpacked it. It contains a blob file that needs to be flashed to the staging partition:
$ fastboot flash staging blob
< waiting for any device >
Sending 'staging' (17598 KB)                       FAILED (remote: 'Bootloader is locked.')
fastboot: error: Command failed
Ofcourse, the bootloader is locked so we are not allowed to flash or boot anything. Let's patch it out.
Fastboot
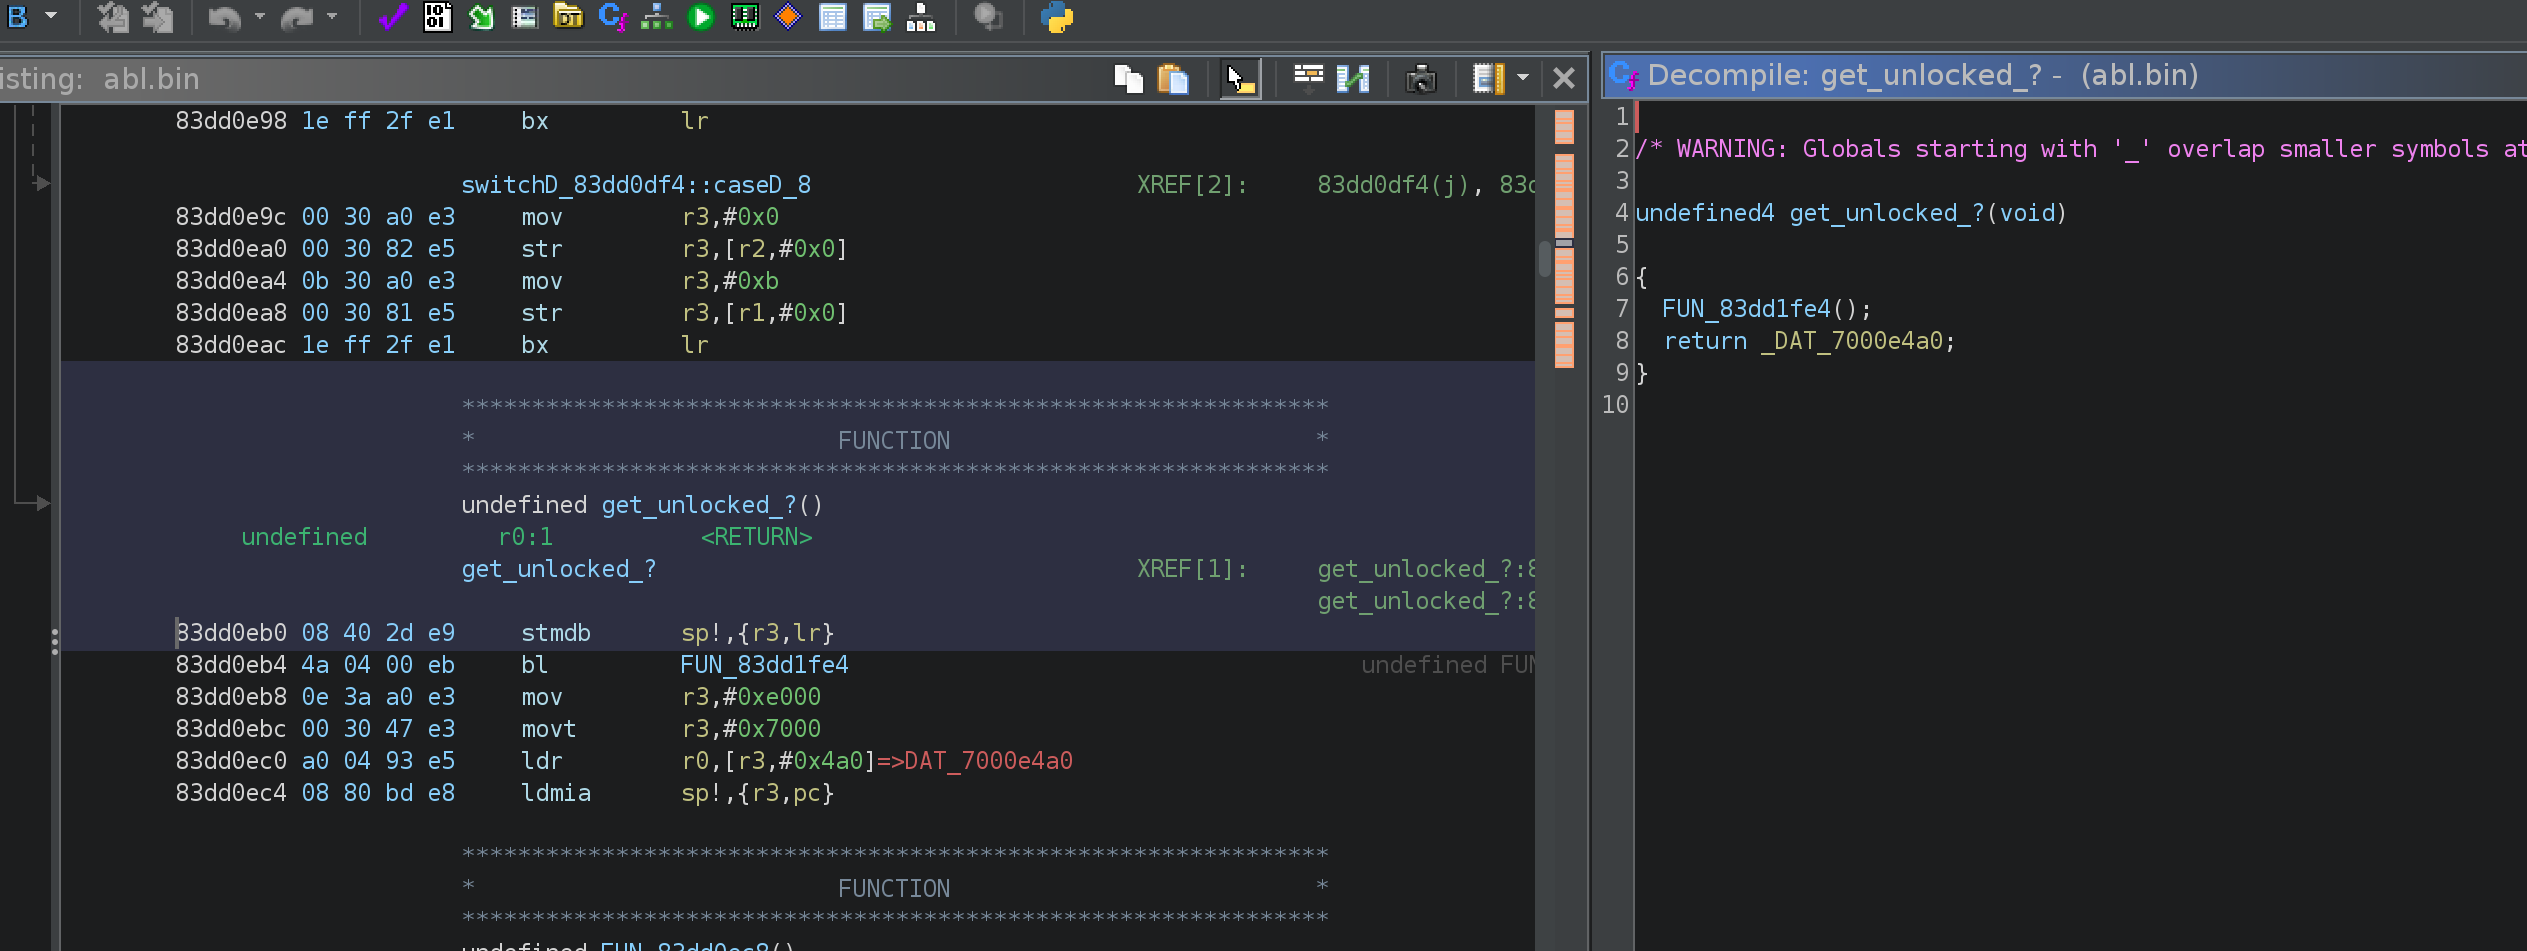
When fastboot loads on this device, it reads a status from somewhere(probably some metadata partition) and that determines it's lock state. Lucky for us there is the string locked and unlocked that is displayed whether this device is locked or not. After a bit of reversing I found this suspicious function:
It turns out that it is doing an SMC call to determine it's lock status. We can ofcourse just patch this function to tell fastboot it's always unlocked:
shellcode = f"""
mov r0, 0x1
bx lr
"""
cd.memwrite_region(0x83dd0eb0, ks_arm.asm(shellcode, as_bytes=True)[0])
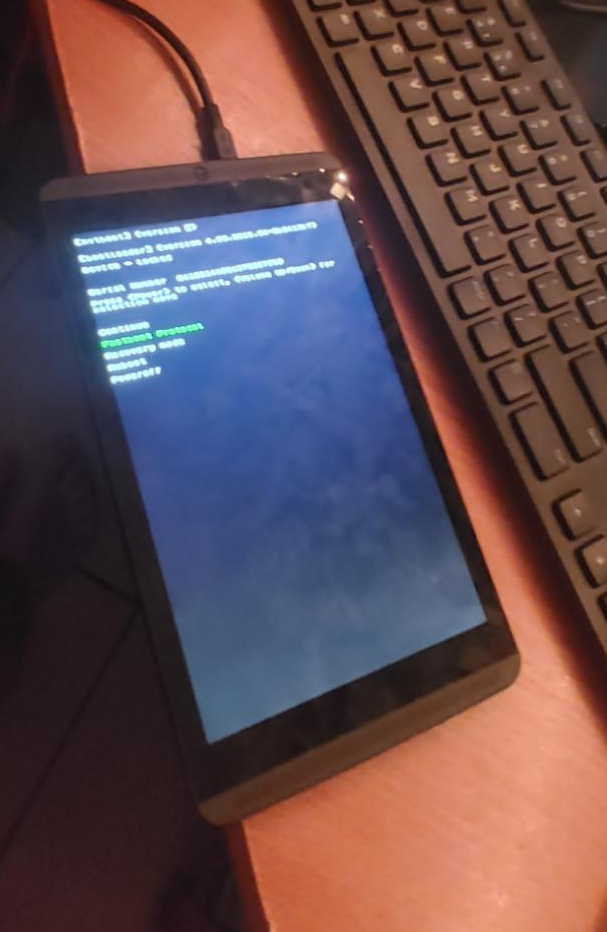
We apply this patch while loading the bootloader in memory. Let's reboot:
It works, we can now flash the staging partition. And yes the device fully boots.
Debugger
The main thing I wanted to show ofcourse is the debugger(Gupje) and the Ghidra Assistant, which work very well in reversing and post exploitation for doing tasks like this. Thanx for reading.
Sources
https://www.cnet.com/pictures/nvidia-shield-gaming-tablet-2/ https://nvidia.custhelp.com/app/answers/detail/a_id/3718/~/voluntary-recall-of-nvidia-shield-tablets https://www.nvidia.com/en-us/shield/support/tabletrecall/ https://github.com/LordRafa/ShofEL2-for-T124
